8 April 2024 Total Solar Eclipse

There are a lot of sites out there to help you get going with eclipse planning this time around. This will give you a lot of links and go-to sites for that information. Happy eclipse viewing!

NASA Eclipse 8 April 2024 Map of Globe
Courtesy NASA

Planning: at this time, getting to and from remote locations is going to be challenging at best. Most flights around the eclipse date are filled. Hotels are also booked. If you are within driving range, be very aware that your drive times will be greatly increased traffic congestion. Our experience has been that getting to a site one or two days early is the easy part if you drive in.  Driving out is next to impossible: again, wait a day or two to leave.  People will try to part anywhere they can, from shopping center lots to the side of the highway. Be safe. Be kind to people. Crowds are challenging.

Planning: 2023 October 14 Annular Solar Eclipse

Not eclipses are total. Many are partial, and some are annular. An annular eclipse takes place when the angular size of the Moon in the sky is smaller than the angular size of the Sun in the sky. What makes this happen? Distances! The further away something is from your vantage point, the smaller is appears. During the eclipse of 14 October 2023, the Moon is close to its apogee, its furthest distance away from Earth in its orbit (remember that the Moon’s orbit is significantly elliptical).  During an annular eclipse, if you are on the eclipse path, you will see the smaller Moon cover the Sun, but not completely. A small thin ring of the Sun will still be visible around the edge of the Moon.  Be very careful! Annular eclipses are NOT safe to look at without proper solar filters or instrumentation!

More on the safe observing practices here: Annular Eclipse Safety

The path of maximum eclipse passes from Texas through to the Pacific Northwest on this occasion. Others across the Americas will see a partial eclipse, an equally exciting opportunity. The chart below (NASA) shows the path.

14 October 2023 Annular Eclipse Map

A reminder: Observe safely. Even when this eclipse is in full annular mode, it is not safe to look at. It is also not safe to aim your camera at for any length of time, as your lens system could suffer damage, as could the sensor and shutter mechanism. Use proper filters!

When to see it?  This website will help you plan your observing schedule with its interactive map. https://science.nasa.gov/eclipses/future-eclipses/eclipse-2023/where-when/

Safe and Happy Observing!  

Springtime Nova: V1716 SCO

Advanced astronomy classes this spring had the opportunity to hone their skills at image data extraction and analysis with a telescope we have been operating in the southern hemisphere. This spring, a classical nova erupted, reaching V magnitude ~ 6.7 or so before fading. We collected data every clear night in photometric filters, V, B and R for analysis and submission to the AAVSO. When done, students had correctly analyzed 176 data points and submitted those as observer GPE (Grainger Phillips Exeter), our AAVSO initials. Below is a plot of the V, B and R data from the AAVSO which includes our data and those from all the other observers who took part in observing this star.

Light curve of AAVSO data for the nova V1716 SCO.

Apparent magnitudes in V, B and R are on the ordinate. Julian Date is on the abscissa. The colors denote filters used: Red = R, Green = V, and Blue = B photometric filters. We acknowledge with thanks the variable star observations from the AAVSO International Database contributed by observers worldwide and used in this research.

Supernova in M-101

This May we were in a fortunate situation: clear skies and a new supernova to observe. The advanced astronomy classes had the opportunity to reduce and analyze the data and feed their results to the AAVSO. Below is a 300 second lum-filter integration of the region of SN 2023ixf in Messier 101. At peak, this object reached an astounding magnitude in V ~ 10.8

Messier 101, the Pinwheel Galaxy, and the supernova are 20.9 million light-years distant. The supernova was confirmed as a Type II meaning it was once a very massive star which, at the end of its “life cycle” had expanded into a red supergiant and imploded resulting in the explosion phenomena you see here.

Comet C/2020 F3 NEOWISE the July 2020 Surprise

This has been quite a year. Now, add to this a bright new comet, and it gets a little better, yes? Comet C/2020 F3 NEOWISE: Named after the Wide Field Infrared Survey Explorer’s asteroid hunting mission [https://neowise.ipac.caltech.edu/], this comet has become visible to the unaided eye, and, for now, is a morning object rising just before the Sun in the northeast sky. By the week of July 13th, the comet will be more of an early evening object, and it should also be getting fainter as it heads both away from Earth and the Sun.

Weather here in New Hampshire is not forgiving to astronomers. In July we typically have high humidity and heat. Add to that some vertical temperature instability, and thunderstorms will be the rule followed by wet foggy mornings once dew point is reached. We did have one clear morning this week, and that allowed for some quick imaging of comet NEOWISE. Be sure to click on the images to see in larger format.

Equipment used:

  • Nikon D-810a with 28-300mm zoom lens at 150mm at f/3.5 and Optolong L-Pro light pollution reduction filter.
  • Nikon D-810 with 300mm telephoto at f/4.
  • Tripods with slow motion controls: untracked.

Those looking to spot the comet should bring with them a pair of binoculars and the information provided in this article from Sky & Telescope. Be sure to find a viewing location away from ground fog, and with a low horizon.  A Bright New Visitor: How to Spot Comet NEOWISE [https://skyandtelescope.org/press-releases/new-bright-visitor-comet-neowise/]

Comet C/2020 F3 NEOWISE

Comet C/2020 F3 NEOWISE

Comet C/2020 F3 NEOWISE

Comet C/2020 F3 NEOWISE

Comet C/2020 F3 NEOWISE

Comet C/2020 F3 NEOWISE


M-42 Orion Nebula

First Light for the 0.7m!

First Light in astronomy is an old tradition filled with all sorts of interesting history. Some first light examples are not the best, while others are just tremendous. Ours was a little of both with the first exposure of the 0.7m telescope to the nighttime sky.  Don’t worry! It all turned out just fine!

The vert first exposure of starlight to the telescope was last week: Conditions were good with a nice clear sky and freezing temperatures. The wind was calm. The telescope had never been focused before and had yet to have a pointing solution…. so it really had no idea where it was looking.  We decided to aim it in the general direction of Orion and take the first images. Of course, they were blurry. The scope had never been focused before. At this point we got the CCD imager into automatic mode, making it take an image every second, non-stop so that we could run the focuser until we had the images nice and sharp…. out the focuser went, and the star images got smaller and smaller and smaller, then “kachunk!” The focuser had run out of travel, and the star images were not quite in focus yet!  The imager was perhaps a few millimeters away from achieving a perfect focus. The good news was that this was more than enough to engage in the time consuming process of collimating the primary mirror. A few hours later we had aligned optics, but we had to order a small spacer ring to push the CCD imagers little further out.

Betelgeuse just slightly out of focus

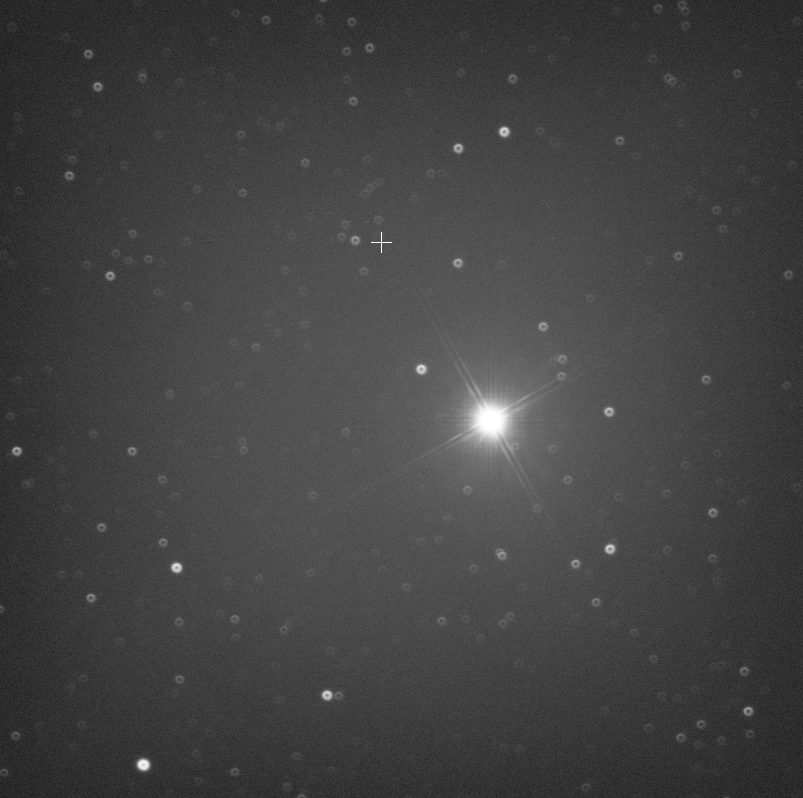
The bright star Betelgeuse just slightly out of focus. Note the doubled diffraction rings around Betelgeuse. Those should be single spikes. The focuser didn’t have enough travel to bring the camera to the needed distance away from the scope. Time to order a part!

The interesting thing about this telescope’s control software is the building of a pointing model. By taking a series of images all over the sky, the software does an astrometric reduction on each image and measures the slight variations in the telescope’s true pointing versus where it thinks it is pointing. This takes care of all sorts of interesting issues: flexure in the pier, telescope and mount, mirror sag or flop (none here!) and general pointing.  After some 20 images, we were able to point to any object in the sky and have it show in the images we took… just like that image of Betelgeuse above.

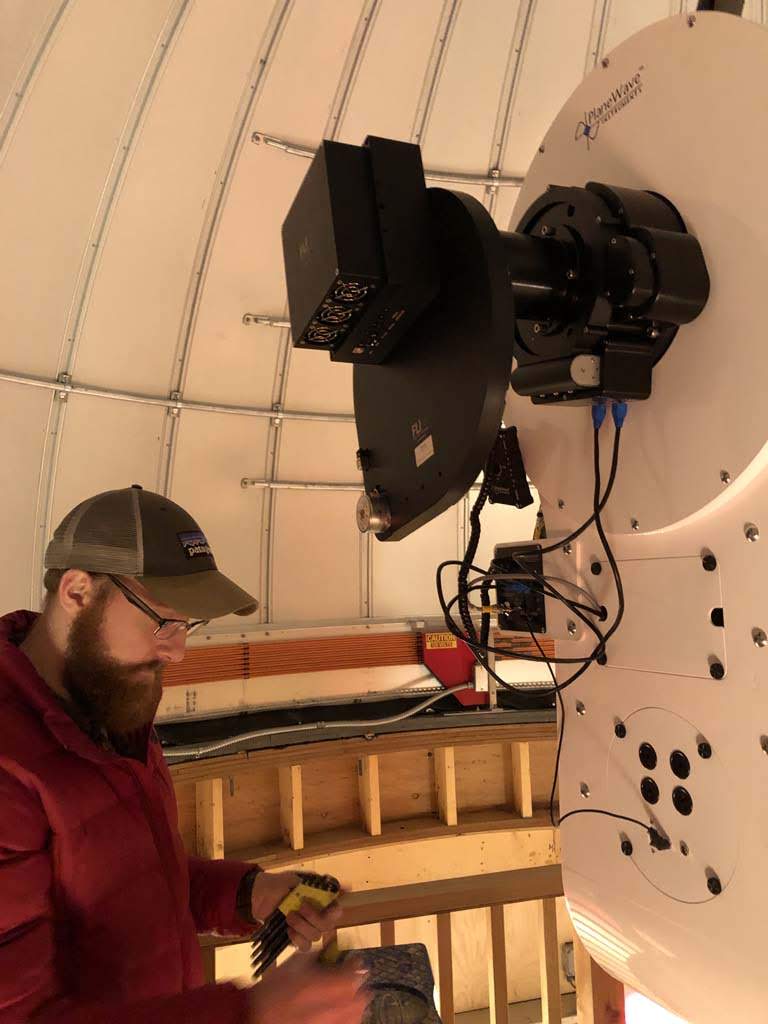
Once the spacer arrived this past Wednesday, we went out to install it and then wait for darkness to arrive. It was a nice clear and very cold night. The goal was to build a large pointing model and take some images of famous deep sky objects. I also wanted to test out a start-up and shut-down procedure that I had typed up earlier in the week.  That evening, we started everything up: the dome was homed and set to track the telescope. The CCD imager was on and cooled to -30ºC. The telescope was on, homed and tracking.  Would it reach focus! Absolutely! It was spot-on perfect. We then built a large pointing model with over 100 images. Now the telescope would find and center objects of our choosing, and it would track them for better than five minutes without needing any autoguider corrections. This is quite the telescope!

We chose some of the iconic late winter deep sky objects to share with you for official first light. These are all composites of four filters:

  • Luminance: a clear filter
  • J-C Rc: which was used as the red channel
  • J-C V: which was used as the green channel
  • J-C B: which was used as the blue channel.

The V, B, and Rc filters are Johnson-Cousins photometric filters used for photometry, the science of measuring brightnesses, which can lead to our understanding of an object’s surface temperature and size, among other things.

You might want to dim the room lights to see the details. Also, click on the images to see in a larger format. Enjoy!

M-42 Orion Nebula

The Orion Nebula, M-42, a star birth region about 1300 light-years away. This can be seen with binoculars and small telescopes easily. It was almost too bright for our CCD imager!


M-82 Galaxy

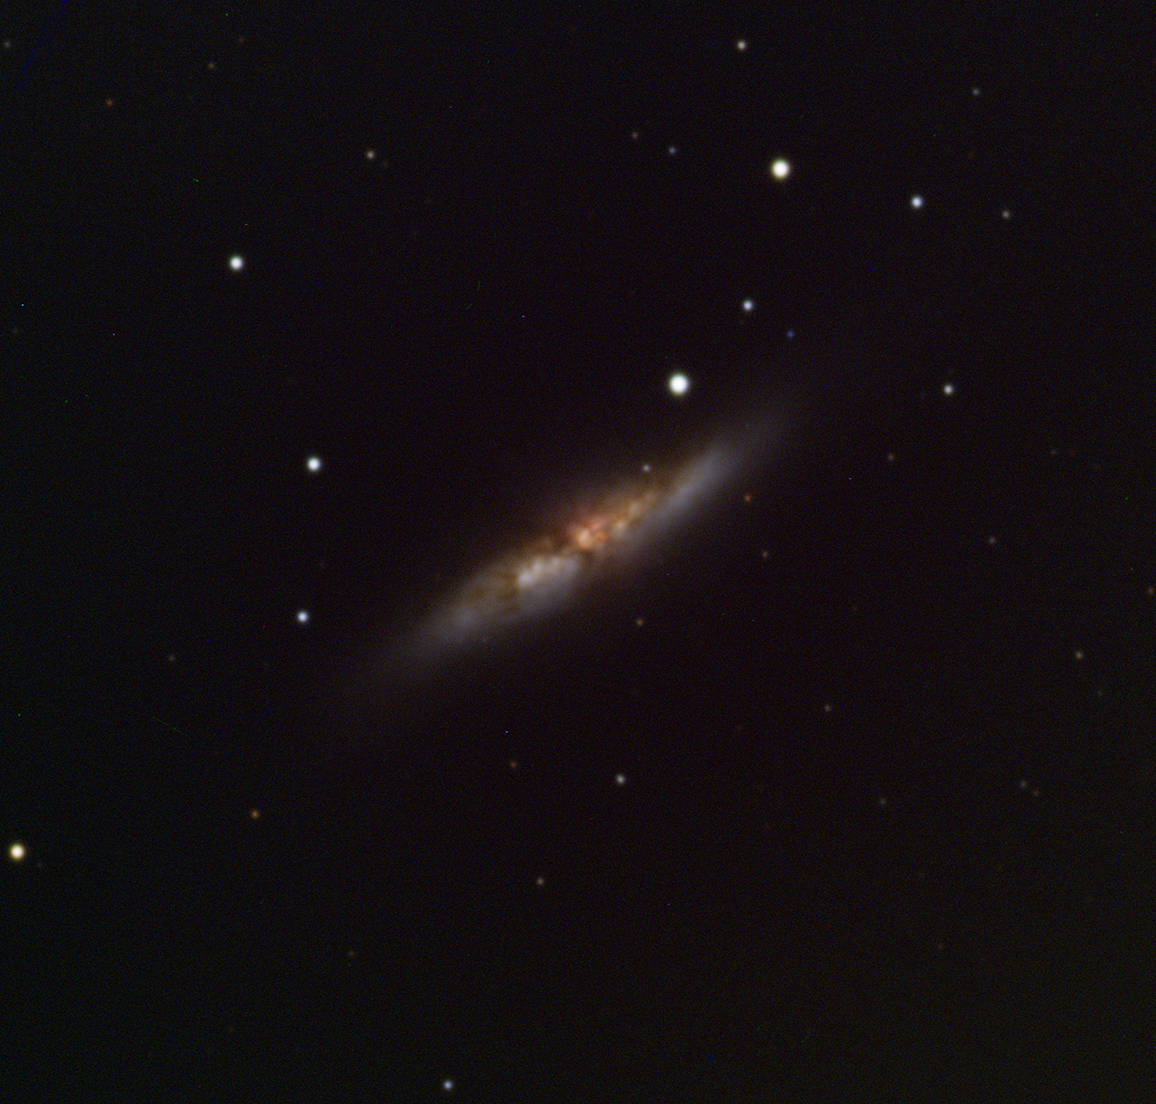
M-82, the Cigar Galaxy, a starburst galaxy about 12 million light-years distant.


M-81

M-81, Bode’s Galaxy, about 12 million light-years away. This resides very close to M-82.


M-1, the Crab Nebula

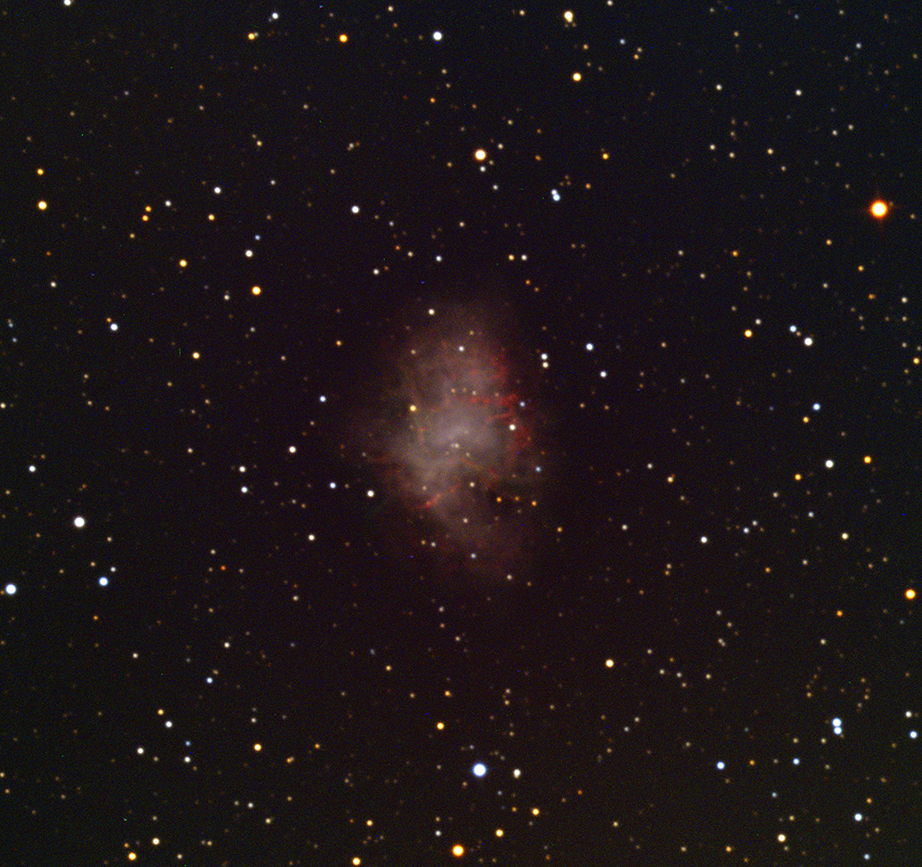
This is the Crab Nebula, M-1 in Taurus. This is a supernova remnant from a star that exploded back in 1054 A.D.

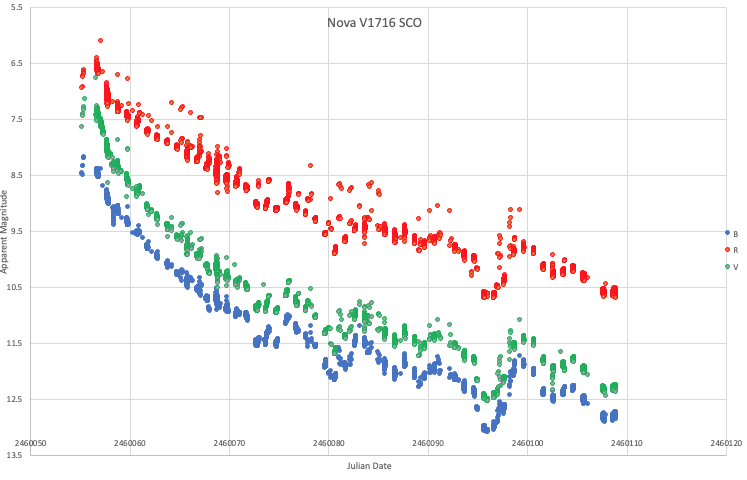
The next phase of this telescope’s use will be to collect scientific data. We have already taken images of U Gem and V Ori to calibrate our photometry and to see if we can produce good data for scientific publication. It has passed with flying colors thus far!


Happy people

Telescope Installation

With the building complete, the time had come to install the telescope. Arriving early on a Wednesday morning, whole crews of people came to be a part of the event: the crane operator, the contractor, architect, videographers, students and more!  It is not often that one gets to see such a large telescope lowered onto its pier using a crane. Below is a photo journal of that day’s events as well as the following day during which PlaneWave’s engineer, Matt Dieterich, and I spent the day wiring the systems and testing the electronics.

Initial pier inspection

Brian Carmody and Matt Dieterich begin the initial inspection of the dome and pier prior to getting the installation started.

The telescope arrives on a flatbed

The CDK700 telescope arrives on a flatbed from the storage facility. The crane and operator has already arrived, so things are about to get busy!

Uncrating

The various telescope components were then uncrated while on the truck.

Tethering the telescope's mount and primary mirror assembly to be hoisted.

Tethering the telescope’s mount and primary mirror assembly to be hoisted. It was at about this point that everyone’s heart rate went up a little!

The telescope is airborne

The telescope is now airborne, taking a short ride from the truck to the pier within the dome.

Enroute to the dome

With some serious expertise, the telescope was guided gently to the dome.

Slipping into the dome

The telescope being lowered through the dome’s shutter. While Matt (and everyone) looks on.

Sunrise with telescope into dome

The sunrise continues while the telescope is gently lowered to the three bolts that will hold it onto the pier.

Slowly, slowly, slowly. Using tag lines, the telescope is kept from swaying or rotating as it is lowered into the dome.

lowered within the dome

The telescope had to be lowered onto the three pier bolts. Tolerances were to the millimeter!

The telescope’s mount holes aligned perfectly with the pier bolts. Everyone breathed a sigh of relief at the exact moment when the scope landed onto the levelling bolts.

Secondary Mirror Assembly craned in

Now it was time to repeat this whole process with the secondary mirror cage and assembly.

Secondary arrives in place

The secondary mirror arrives in place and is bolted to the telescope.

The telescope's control system

Next to install was the telescope’s control system which feeds power, reads encoders and sends commands back and forth through a neat intranet system.

Components within

The many components within the control box.

Initial collimation

Using a laser mounted onto one of the two Nasmyth focal points, Matt begins initial collimation of the three mirrors. The corrected Dall-Kirkham optical design uses an elliptical primary, a spherical secondary and a flat tertiary mirror.

Many wires!

The many wires routed from the telescope’s interior, to the control box and to the control room computer.

Wires to be connected at the mount

Those same wires, this time a view from the base of the telescope mount. Within the mount are USB hubs, power supplies, and encoder systems. All must be wired correctly to allow proper control and to prevent twisting as the telescope moves in azimuth.

The pirmary CCD and filter wheel installed

The primary instrument will be an FLI CCD imager with a 10-place filter wheel, seen here at focal port #1 attached to the electronic focuser/de-rotator. All of these components are remotely controlled. 

Happy people

Brian, Matt and John: three happy and very tired telescope installers. The end of two days of work. Next steps? Clear skies to collimate and focus the telescope then build a pointing model.


Betelgeuse is Fading

There has been a lot of buzz on the net about the star, Betelgeuse, Alpha Ori… the red supergiant in Orion’s shoulder (or armpit as people might prefer). It is a well known, bright red, supergiant, and it is a well known variable with a long period. Of late, it has been fading rather unusually for its regular patterns of ups and downs in brightness. This fading has everyone charged up…. you see, the star is old, near the end of its life. Stars of this high mass are supposed to supernova… BOOM! The trick is to know when. We have little idea on that, so any changes seen in stars like this make us get realllllly focused. Below is a snap of the latest observations of Betelgeuse’s brightness in V taken from the AAVSO. You can go see this data for yourself at http://www.aavso.org, and entering “Alfa Ori” sans quotes into the “Pick a star” field on the lower right of the page. Select plot light curve after that.

AAVSO V filter light curve of Betelgeuse

AAVSO V filter light curve of Betelgeuse

Orion with Betelgeuse as it would appear at 9:00pm from mid-northern latitudes tonight (January 15)

Orion with Betelgeuse as it would appear at 9:00pm from mid-northern latitudes tonight (January 15)

Orion with Betelgeuse as it would appear at 9:00pm from mid-northern latitudes tonight (January 15)

Exterior view with the lower shutter open and the dome rotated to point north.

The Dome Works!

Not a surprise at all, but we now have a rotating, opening and closing dome!  Next steps are to putty in the weather seal along edges, and it will be complete. The interior of the building is getting walls and paint soon. Lighting and network cabling come next followed by the installation of the telescope by end of January!  Stay tuned!

A wide angle look at the dome interior with the lower shutter open.

A wide angle look at the dome interior with the lower shutter open.

Exterior view with the lower shutter open and the dome rotated to point north.

Exterior view with the lower shutter open and the dome rotated to point north.

All three of the observatory's domes visible for comparison.

All three of the observatory’s domes visible for comparison.

Below: Two short movies of the dome shutter being opened. This is a two-part process with the top shutter opened first followed by the lower shutter which tilts out. The top shutter’s lower edge overlaps the bottom shutter thus preventing weather from getting inside.


There is a Roof and a Dome

Progress has been swift on the construction of the new building.  Roofers have installed the waterproof roof layer and sealed around the dome’s base structure (framing). The dome has been built in place, and the shutter also installed.  Interior work now progresses with the installation of the walls, trim, lights and such. Remember that for any of the images below, just click on them for a larger view.

Prior to pouring the concrete walkway we were expecting both rain then snow and freezing temperatures. Heating pads were placed to prevent frost on the ground before pouring the cement.

Prior to pouring the concrete walkway we were expecting both rain then snow and freezing temperatures. Heating pads were placed to prevent frost on the ground before pouring the cement.

One wall has siding in this image, and the dome opening has been covered to protect the interior from rainfall.

One wall has siding in this image, and the dome opening has been covered to protect the interior from rainfall.

All four exterior walls now have been sided, ventilation louvers have been installed, and the roofers are working on the rubberized layer on top the structure and around the dome, base frame.

All four exterior walls now have been sided, ventilation louvers have been installed, and the roofers are working on the rubberized layer on top the structure and around the dome, base frame.

Inside the control room, the base bearings of the dome have been unpacked for inspection and comprehension! So many parts are in this package, that it is a little mystifying.

Inside the control room, the base bearings of the dome have been unpacked for inspection and comprehension! So many parts are in this package, that it is a little mystifying.

The view of the telescope room through the framed wall of the control room. The window casement has been installed along with initial conduit for electrical. network and telescope control lines.

The view of the telescope room through the framed wall of the control room. The window casement has been installed along with initial conduit for electrical. network and telescope control lines.

The dome is almost complete in this image taken at 6:30am with the sun rising. The dome's motion is smooth and has that familiar rumble to it as it rotates in azimuth on its well-aligned and level bearings.

The dome is almost complete in this image taken at 6:30am with the sun rising. The dome’s motion is smooth and has that familiar rumble to it as it rotates in azimuth on its well-aligned and level bearings.

A wide-field image of the dome interior. Note that edges are a little warped in this image due to the camera's odd stitching of the frames. You can see the top of the pier and the orange power line system for dome operations which make the system effectively wireless. No wires will be dangling down from above to control the dome's motion.

A wide-field image of the dome interior. Note that edges are a little warped in this image due to the camera’s odd stitching of the frames. You can see the top of the pier and the orange power line system for dome operations which make the system effectively wireless. No wires will be dangling down from above to control the dome’s motion.

Roof is complete. Dome is complete. Door has been installed.

Roof is complete. Dome is complete. Door has been installed.